Page 15 of 23
Re: Fan shroud upgrade
Posted: May 16th, 2016, 12:45 pm
by Neotko
Sont worry about that holes because you need to drill them. And the bottom use a m3 tap.
Re: Fan shroud upgrade
Posted: May 16th, 2016, 3:37 pm
by LePaul
Well finding metric drills and taps in America is ....challenging!
I think I sourced a Metric drill/tap/deburr at Harbor Freight
I am also pondering trying to print the large shroud piece again, this time in the "sweet spot" of my printer....and possibly upright. I'm really curious how it would come out, I am really not happy with the first attempt
Re: Fan shroud upgrade
Posted: May 16th, 2016, 3:40 pm
by Izzy
If you have problems with metric taps let me know I'm sure I can get some to ship to you
Re: Fan shroud upgrade
Posted: May 16th, 2016, 3:51 pm
by LePaul
Offer appreciated! I'm sure we have them...just not a common item locally.
Re: Fan shroud upgrade
Posted: May 16th, 2016, 4:17 pm
by Neotko
Flat might make a stronger flat area below the nozzle, but a more challenging cleanup. Originally I designed it so it could be printed without supports but since carbon can't bridge.. Also the area below the heater it's done 0.8 wide so it made two walls when printing it rotated.
If you can't get a tap just heat a screw and screw it. It will need some force but if you don't tilt the screw it should be fine.
Re: Fan shroud upgrade
Posted: May 16th, 2016, 4:58 pm
by LePaul
Re: Fan shroud upgrade
Posted: May 16th, 2016, 5:04 pm
by Neotko
.5? No idea... I just went to the hardware store and bought a m3-m4-m5 tap set :O
Re: Fan shroud upgrade
Posted: May 16th, 2016, 5:15 pm
by LePaul
Well no metric drill bits!
So wound up with this combo drill tap deburr
Re: Fan shroud upgrade
Posted: May 16th, 2016, 10:19 pm
by LePaul
So here's tonight's print this time printed upright. Little bit of layer adhesion/under extrusion I think. I was printing at 40mm/sec on the higher layers, 35 at the lower. Should have stayed slow
Almost done printing
Re: Fan shroud upgrade
Posted: May 16th, 2016, 10:26 pm
by LePaul
Re: Fan shroud upgrade
Posted: May 17th, 2016, 5:39 am
by antiklesys
Looking forward seeing this mounted
Re: Fan shroud upgrade
Posted: May 17th, 2016, 5:41 am
by Titus
Re: Fan shroud upgrade
Posted: May 17th, 2016, 12:11 pm
by LePaul
I need to trim/clean and file off the excess blobs.
I was looking at Neo's animated assembly and saw he has screws going in the underside...but I don't think that's needed since the UMO's screws go all the way through the aluminum piece and beyond, so a lock-washer and nut should suffice. Metric stuff is tough to source so the fan to shroud might wind up being SASE/Imperial to make it all work Tonight I have make sure my fans line up and if they do, some soldering!
Re: Fan shroud upgrade
Posted: May 17th, 2016, 1:11 pm
by Neotko
You can use the step files to change anything. Well, except there's no 50x50 step version....
You might need spacer on the upside for umo since the screws are loooong
Re: Fan shroud upgrade
Posted: May 17th, 2016, 2:53 pm
by Amedee
Mine is progressing slowly...
I eventually had to disassemble the whole shebang to get my heater block in the right direction.
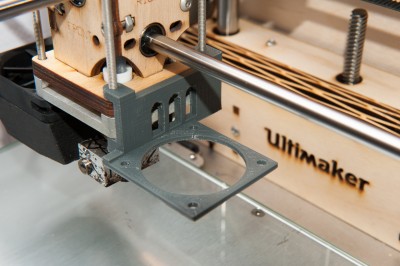
I printed the side parts in one piece to have something more rigid to hold the fan. So here is the first part (in nGen)

- Right holder
It fits perfectly, but will probably make them 1mm taller to allow some play when the top screw are loose (so we can compress a bit the bowden)